MythTV
MythTV is a project I've worked on and off as a hobby (first working install was about 3 years ago). It is comparable to a digicorder but then completely open source linux distribution running a MythTV qt application and with many more capabilities/features. It has automated recording and show shifting (pausing live tv) but it can also play my dvd's, write recordings to dvd, play divx, play mp3, rip cd's to mp3, copy fotos from digital cam and view them in galleries, play emulated games on mame, psx-emu (playstation emulator), amiga emulator etc.
So basically it is just a regular PC in a nice (homemade box) that fits snugly under the tv, using lirc it is controlled with a regular tv remote. But I've played with the idea of using a wii-mote instead since it has excellent linux support as well. With main advantages over other harddrive based recorders being more codecs, cheaper parts, more features and easier to extend its features etc... The bios wake-on timers are also supported so the system wakes up even when turned off to record showings (unfortunately the xml feed with the belgian tv programs sometimes fails but this is due to the site teeveeblad.be which is sometimes down).
Introduction, Building a MythTv box
The box itself is a regular old pc desktop system with a new front panel that was spray painted several times then coated several times and sanded again until a glossy finish was achieved.
- This is an extension to the Myth TV tutorial on this site.
- Some usefull links:
- Inspiration tutorial for building the lcd interface: http://www.myrolypoly.com/lcd_project/lcd_project.html
- ps/2 specification : http://panda.cs.ndsu.nodak.edu/~achapwes/PICmicro/PS2/ps2.htm
- USB power http://www.darkain.com/portability.php?portid=1&page=5 (not needed here)
- Linux driver software: http://lcd-linux.sourceforge.net/.
- Cheap and cewl LCD's: http://www.htvision.com (this is where I got mine and was cheapest place I could find near to belgium that sold lcd's with backlight, mine was a mere 13 euro with shipping ).
Connecting the hardware
- When I have time I will post a graphic schematic here, for now use the tables (they are much easier to follow and less prone to making mistakes anyway...)
- I find in practice it's easier to use tables, here are the pins you must connect from parallel port
| DB 25 connector Pin Number | LCD Pin Number | LCD Pin Description |
| 1 | 6 | Enable |
| 2 | 7 | Data 0 |
| 3 | 8 | Data 1 |
| 4 | 9 | Data 2 |
| 5 | 10 | Data 3 |
| 6 | 11 | Data 4 |
| 7 | 12 | Data 5 |
| 8 | 13 | Data 6 |
| 9 | 14 | Data 7 |
| 14 | 5 | Read/Write |
| 16 | 4 | RS |
- Now this leaves pins 1,2,3,15 and 16 left open on our lcd.
- The first two are power for the control chip and 15,16 are for the backlight.
- Pin 3 is contrast control just connect it to pin 1 for full contrast.

| 6-pin Mini-DIN (PS/2): |
| 1 - Data |
| 2 - Not Implemented |
| 3 - Ground |
| 4 - Vcc (+5V) |
| 5 - Clock |
| 6 - Not Implemented |
- Connecting the power :
| ps/2 connector(male) pin | LCD Pin Number | LCD Pin Description |
| 3 | 1 | Ground |
| 4 | 2 | +5V |
| 3 | 16 | Backlight Ground (K) |
| 4 | 15 | +4.2V (max 5) |
- Connecting contrast :
| LCD Pin Number | LCD Pin Number | Description (of second column) |
| 1 | 3 | Contrast |
Software
- Well now you have your lcd and you switched on the computer and if all went right the backlight goes on and you see some squares (these are all black characters, or inverted spaces ).
- Since this is for mythboxes, I'm only gonna talk about software for linux (more specific knoppix linux). Go and get the latest .tar.gz from http://lcd-linux.sourceforge.net. Read the documentation which basically says you need to have your kernel sources installed correctly and then you do a 'make' and as root a 'make install'.
- Now for some scripts that show the next recording, the time and the disk usage. It's a little wsbasic script (my own scripting language because I don't like the bad syntax in bash ;) ). If anyone writes an equivalent in bash please mail it to me walle@nerdhero.org !
- http://walle.nerdhero.org/mythbox/lcd-stats.bas start this one up in /etc/init.d/bootmisc.sh
- http://walle.nerdhero.org/mythbox/shutdown.bas start this one in the vdrshutdown script if you use automatic powerdown. (you need to add killall lcd-stats.bas and then run shutdown.bas just before the halt commands which occur twice in this vdrshutdown script).
- Last but not least you need the wsbasic scripting language. You can get the latest release on sourceforge http://wsbasic.sourceforge.net. Do a make and then copy the wsbasic executable to /usr/bin/ (don't worry it's verry lightweight, about 100K).
Pictures
- Proof of concept, running lcd on old Motherboard for first time using only ps/2 power:

- The working display (yeah and the mythbox already collected some dust while paint was drying in my garage ):

- Close up:

- My mythbox (almost finished apart from last paintjob) with display still outside, the display will eventually go in bottom right where the clear viewing window is:

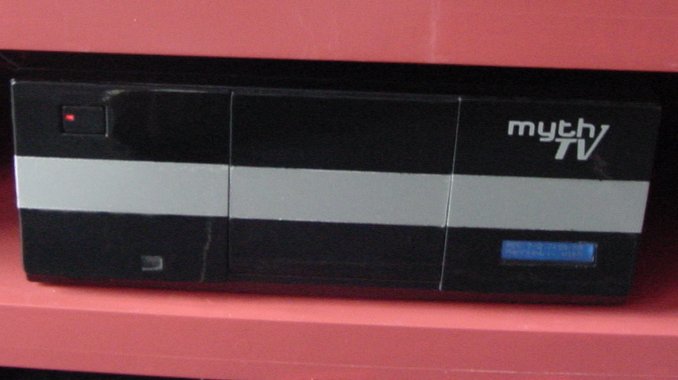
- My mythbox finished, with logo nice and shiney and lcd built in :

- and a close-up fits nice and snug under my tv ofcourse I mostly use it with my projector nowadays which is a BenQ 6100 (good lumens, low noice and been working fine in a smokers environment for 2 years now so its got my thumbs up).

- My tutorial on how to connect an LCD display to MythTV on nerdhero cube wiki: http://nerdhero.org/index.php/Howtos/LcdDisplay
- MythTV source : www.MythTV.org
- MythTV linux distro : http://www.mysettopbox.tv/knoppmyth.html
- lirc open source software for using a IR-remote control on pc : www.lirc.org